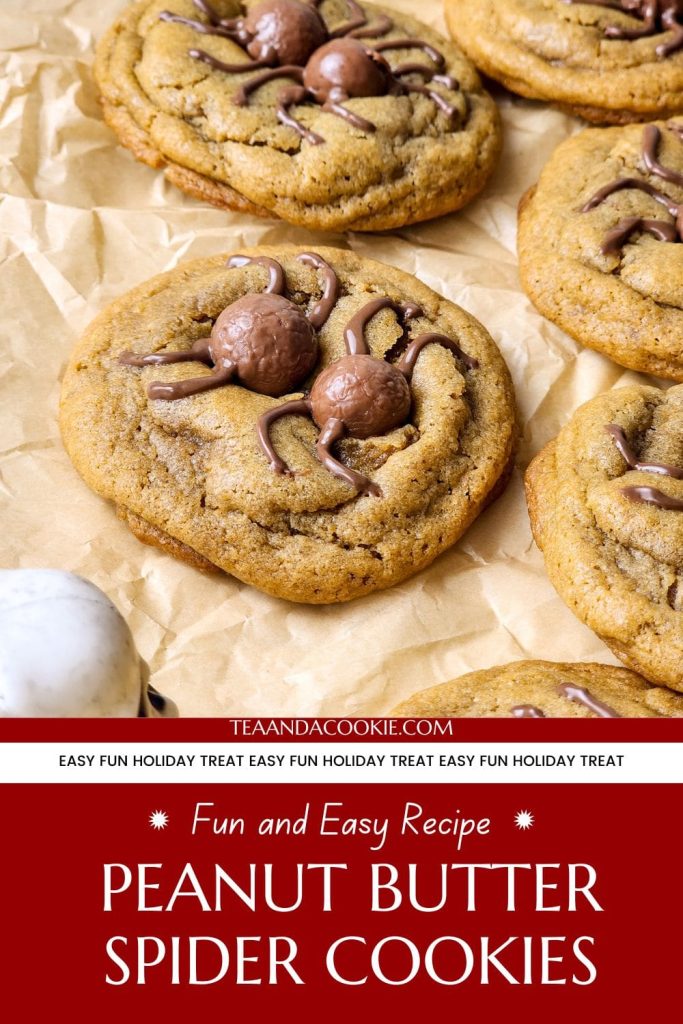
Easy Peanut Butter Spider Cookies Recipe for Halloween
Make your Halloween extra sweet with these peanut butter spider cookies. More than just a cute treat, these fun cookies give a creepy-crawly twist to the classic peanut butter cookie. It’s the perfect combination of chocolate and peanut butter. An easy cookie that kids love to make and eat.
Making Peanut Butter Spider Cookies
One of the things that I love about this peanut butter spider cookies recipe is that it’s so easy. You don’t need a stand mixer or hand mixer. Since it uses melted butter, it’s easy to mix in a large bowl by hand. I like combining the wet ingredients with a whisk and then switching over to a spoon to mix the dry ingredients gently. It couldn’t be easier, and that’s one of the reasons why it’s a great recipe to make with kids.
Because the recipe uses melted butter, the dough will be very soft after you mix in the flour. That’s why you need to chill the dough for at least 30 minutes. Chilling helps the peanut butter cookie dough set-up a bit, which means that the cookies will hold their shape better when baked. Cover the bowl and refrigerate. Or, transfer to an airtight container and refrigerate overnight. Refrigerating the dough is especially helpful for making the cookies for a Halloween party. You can make the dough one day and bake the cookies the next.
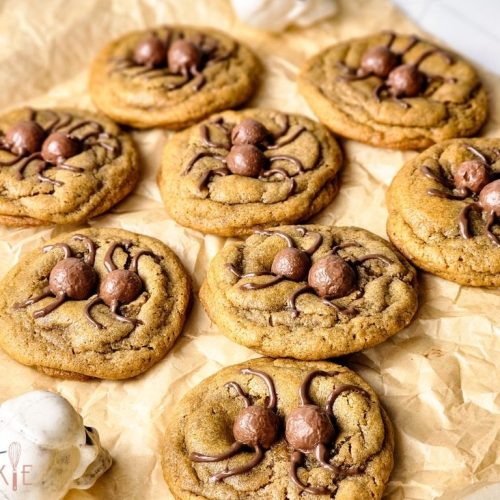
To get soft peanut butter cookies, make sure that you don’t overbake the cookies. You want the edges to just be set and turning a light golden brown. Immediately add the malted milk balls to the cookies to form the body of the spider. Then let the cookies cool on the baking sheet for 5 minutes before transferring to a wire rack to cool completely. Once the cookies are cool you can move onto making the spider legs using melted chocolate.

Variations for Spider Cookies
This peanut butter spider cookies recipe calls for using malted milk balls, but there are other ways to create spiders. Here are a few variations you can try.
- To make the spider body, use mini Reese’s cups instead of the malted milk balls. Place 2 mini cups upside down on top of the peanut butter cookie. These will melt more than the malted balls, so you can wait a minute for the cookies to cool down slightly before putting them on. If the cookies cool too much and the Reese’s peanut butter cups won’t stick to the cookie, use a little melted chocolate as the glue to hold them together.
- Use chocolate, and melted chocolate, to make the spider. You have a couple of options for using chocolate. The first is to use melted chocolate to make the whole spider. Increase the amount of milk chocolate to about 1/2 cup so that you have enough to make the spider bodies. Make two round balls of chocolate for the body and then draw the chocolate legs. Another option is to use chocolate chips or larger chocolate discs for the body.
- When it comes to chocolate, you can also create variations using different types of chocolate. While milk chocolate is classic when mixed with peanut butter, dark chocolate is also good. In addition to tasting good, dark chocolate has a darker color, making the spiders stand out more against the color of the peanut butter cookie.
- Substitute your favorite candy to make the spider. You can use chocolate truffles, chocolate balls, Hershey kisses, mini Kit Kats, mini Milky Bars, mini Snickers, or Peanut M&Ms. There is no right or wrong way to make the spiders for these Halloween cookies. If you want to make the little guys cute or you want spooky spider cookies, the choice is up to you. Add some candy eyes if you want to give some extra dimension to the spiders.
Step by Step With Photos
In a large bowl, mix together 3/4 cup melted butter, 1/3 cup peanut butter, 1 1/4 cups brown sugar, and 1/4 cup granulated sugar. Whisk together until smooth.

Add 2 eggs and 1 teaspoon vanilla extract. Mix together until smooth and creamy.

Add 2 1/4 cups flour, 1/2 teaspoon baking powder, 1/2 teaspoon baking soda, and 1/2 teaspoon salt. Gently stir the dry ingredients into the wet ingredients, but don’t overmix. Mix just until combined.

Cover the cookie dough with plastic wrap or put it in an airtight container and refrigerate for at least 30 minutes. When you’re ready to bake the cookies, preheat the oven to 350 degrees Fahrenheit and line a baking sheet with parchment paper.
Use a cookie scoop to make cookie balls. Place the cookie dough balls on the parchment-lined baking sheet. Use your fingers to gently press down on the cookie dough balls to flatten them a bit. Bake the peanut butter spider cookies for about 13 minutes.

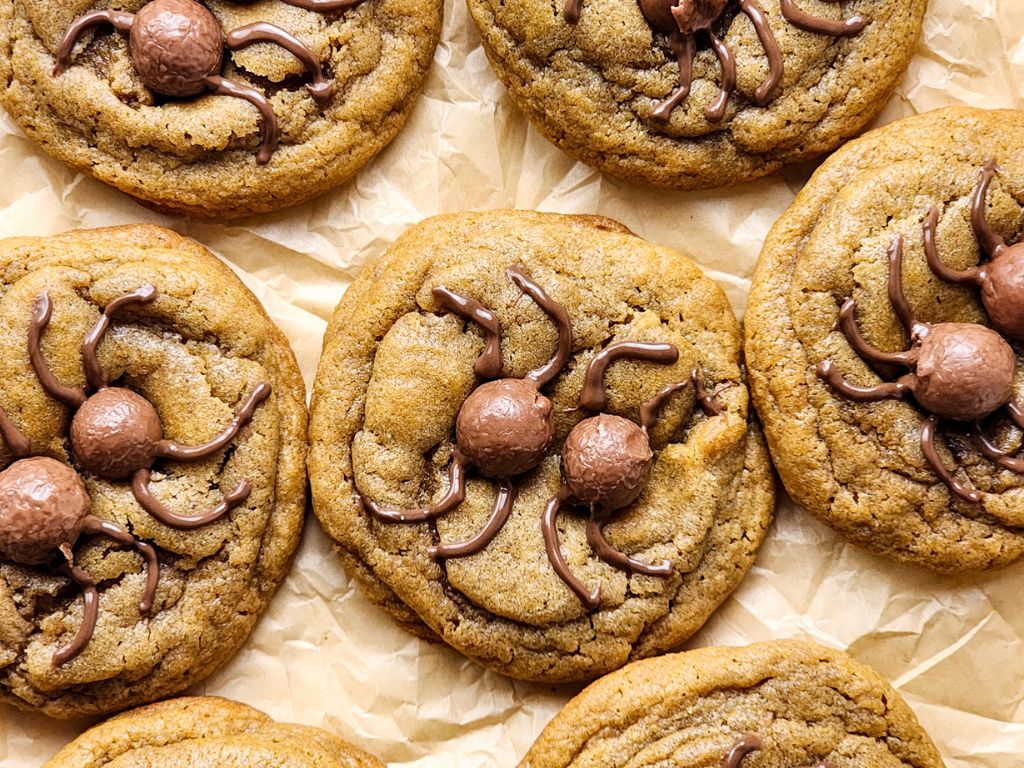
After you remove the cookies from the oven, immediately place 2 malted milk balls in the center of each cookie to make the spider’s body. Let the cookies cool for 5 minutes. Melt 1/4 cup of chocolate in the microwave. Transfer the melted chocolate into a piping bag and snip the tip of the bag. Draw 2 legs on each side of the malted milk balls to make 4 spider legs.

These adorable peanut butter spider cookies are such a fun cookie to make for Halloween parties. They’re an easy Halloween treat that is so much fun to make with the kids. Make it a competition to see who can come up with the best-looking spider. I guarantee that the kids will have a blast coming up with creative ways to make what they deem the perfect treat.
More Halloween recipes to try:
If you try this Peanut Butter Spider Cookies recipe or any other recipe on my blog, please leave a 🌟 star rating and tell me how it went in the 📝 comments below. Thanks for visiting, and happy baking!
Peanut Butter Spider Cookies
Equipment
- Cookie Sheet
- Parchment Paper
- Cooling rack
- Measuring Cups
- Measuring Spoons
- Mixing Bowl
- Piping Bag
- Cookie Scoop
Ingredients
Cookie Batter
- ¾ cup unsalted butter melted
- ⅓ cup creamy peanut butter
- 1 ¼ cup brown sugar
- ¼ cup granulated sugar
- 1 teaspoon vanilla extract
- 2 eggs
- 2 ¼ cup all purpose flour
- ½ teaspoon baking powder
- ½ teaspoon baking soda
- ½ teaspoon salt
Topping
- Malted Milk Balls
- ¼ cup milk chocolate chips melted
Instructions
- In a large mixing bowl, add the melted butter, peanut butter, brown sugar and white sugar. Whisk together until smooth and thoroughly combined.
- Add in the eggs and vanilla extract, whisking again until the ingredients are combined.
- Pour in the flour, baking powder, baking soda and salt. Fold the dry ingredients into the wet until a dough forms. The dough will be soft.
- Cover the bowl with plastic wrap and place in the refrigerator to chill for 30 minutes.
- Preheat the oven to 350 degrees Fahrenheit and prepare a baking sheet with parchment paper.
- Use a cookie scoop to scoop out medium sized cookie dough balls. Roll the balls of dough in your hand to make them more symmetrical. Place on the baking sheet about 2 inches apart from each other.
- Press the cookie balls with your fingertips to flatten slightly. Bake in the oven for 13 minutes or until the edges of the peanut butter cookies are slightly golden.
- As soon as you remove the cookies out of the oven, take the malted milk balls and place two in the middle of each cookie side by side. This is to create the spider’s body.
- Let the cookies cool for 5 minutes.
- While the cookies are cooling, melt the chocolate in the microwave at 30 second intervals, stirring in between, until smooth.
- Transfer the melted chocolate into a piping bag and cut a small hole at the tip.
- Use the piping bag to create 4 spider legs coming out of each malted ball, 2 on one side and 2 on the other. Curve the legs downwards.
- Repeat the legs on the other malted milk ball, curving the legs upward to finish the look of a spider.
- Store in an airtight container.
Notes
- Can chill dough for up to 2 days in the refrigerator.
- If you don’t have a piping bag for the melted chocolate, you can use a Ziploc bag instead. Snip a small hole in the corner of the bag to apply the chocolate.
Follow me on Pinterest for fun and easy cookie recipes for any occasion. If you try this recipe, be sure to leave a comment and let me know how it went.

- Red Velvet Blossom Cookies Recipe: Festive and Easy to Make - February 18, 2026
- Baileys Irish Cream Cookie Recipe: Fun Leprechaun Hats - February 4, 2026
- Easy Flourless Chocolate Tart Recipe: A Gluten-Free Treat - January 29, 2026