Fun Rudolph Chocolate Covered Marshmallow Candy Recipe
This Rudolph chocolate covered marshmallow candy recipe is an easy homemade treat that captures the spirit of the season. No candy experience needed. These chocolate candies are a no-bake treat that turns marshmallow-filled chocolate into kids’ favorite reindeer. With pretzel antlers and a shiny red nose, these Rudolph chocolates are a fun sweet to make with kids.
About Chocolate Covered Marshmallow Candy Recipe
You don’t need advanced candy-making skills or specialized equipment—just a silicone egg mold, some melted chocolate, marshmallow creme, and a handful of colorful mini M&Ms to bring these little characters to life.
The beauty of this recipe lies in its approachability. If you have ever felt intimidated by elaborate holiday baking projects that demand hours of precision work, this one invites you to have fun and express your creativity. The process feels playful rather than demanding, making it an ideal activity to share with kids or to enjoy as a low-stress way to add homemade touches to your holiday spread.

Here are the ingredients needed.
- 12 Ounces Brown Melting Chocolate
- Marshmallow Fluff
- Pretzel Bows
- Red Candy Coated Chocolates
- Mini Candy Coated Chocolates
- Candy Eyes
Step by Step With Photos
This chocolate covered marshmallow candy recipe comes together quickly, so you can whip them up in no time. Here are the steps to making these adorable Rudolph candies.
Start by melting the chocolate or chocolate candy melts in the microwave in 30-second intervals. Once melted and smooth when stirred, place about 1/2 Tablespoon melted chocolate into each mold.


Use the back of a spoon to spread the chocolate around the mold, then place the mold in the freezer for about 10 minutes. You can also refrigerate them instead if you don’t have space in your freezer for the mold. Remove the mold from the freezer, then repeat the process to add a second layer of chocolate. This helps strengthen the shell of the chocolate eggs. Freeze for 3-5 minutes, then remove from the freezer and add a few mini M&Ms into each egg.


Place a spoonful of marshmallow creme into each chocolate egg, then top with more mini M&Ms. If the marshmallow is sticking to the spoon, you can spray it with non-stick spray. Or, rub a little butter on it to prevent the marshmallow from sticking.


Reheat the chocolate in the microwave for 30 seconds. Stir, and then pour the chocolate on top of the marshmallow to completely fill the molds. Be sure to cover it completely so that there aren’t any openings where the marshmallow can leak out. Place the mold in the freezer for 5-8 minutes until chocolate has set. Gently remove each chocolate egg from the mold.


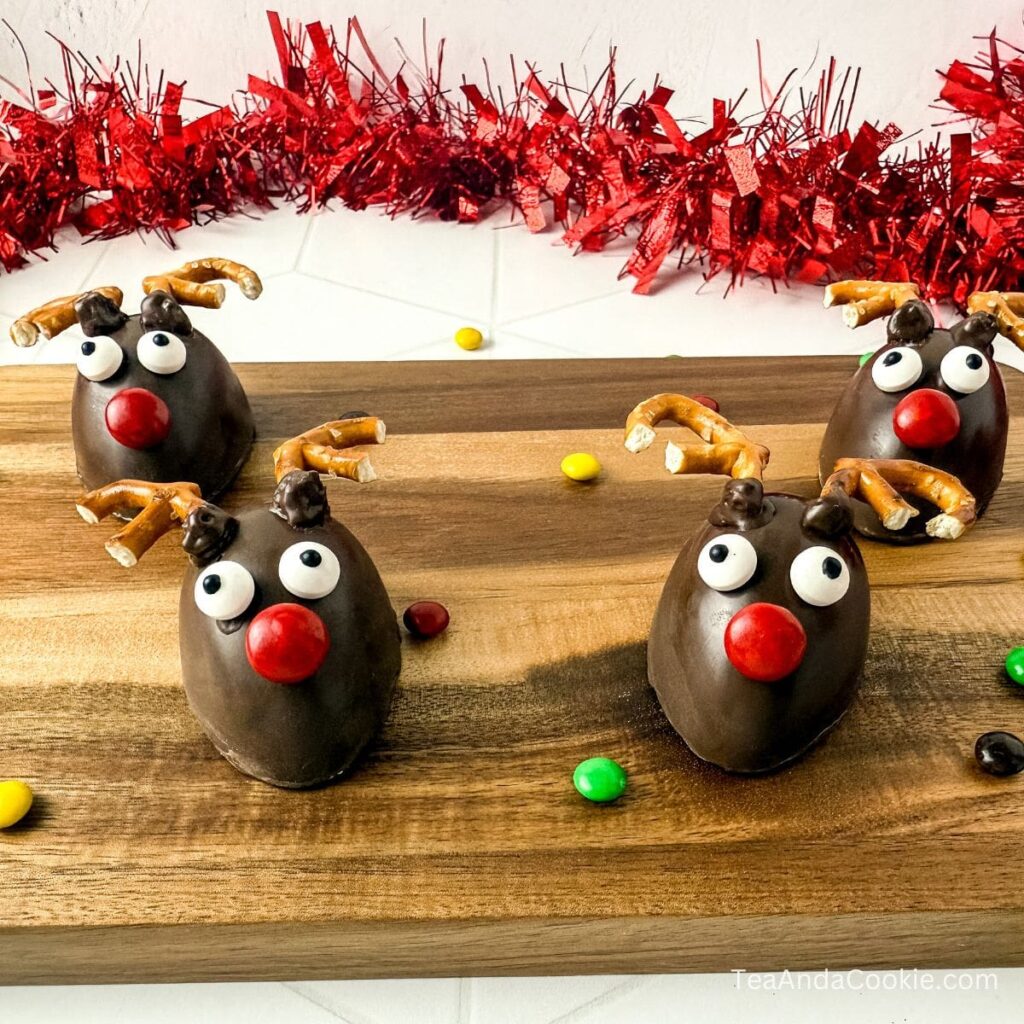
Transfer the remaining melted chocolate into a piping bag and snip the tip. Break each pretzel in half to make the antlers. You will need 2 pretzel antlers, 2 candy eyes, and one red M&M or red candy for the nose.


At the wide end of the egg, pipe a dot of chocolate. Place a piece of pretzel on top of the chocolate and hold in place until it sticks. Add another drop of chocolate on top of the pretzel to help it stay in place. Repeat with the second antler.


Place two small dots of melted chocolate underneath the antlers and add a candy eye on top of each dot. Then place a dab of melted chocolate beneath the eyes and top it with a red candy like a red M&M, or any shiny red candy. Let the Rudolph chocolates rest for a minute to allow the faces to set.


I hope you have fun making this Rudolph chocolate covered marshmallow candy recipe. When you hand someone a homemade treat, you’re offering more than chocolate and marshmallow. You’re sharing time and attention, the small imperfections that prove human hands were involved, and a bit of seasonal joy wrapped up in an edible package. These reindeer candies carry that Christmas spirit, their slightly crooked smiles and uneven antlers only adding to their appeal.
Whether you’re making a small batch for your family or creating dozens to share with neighbors, coworkers, and friends, this recipe welcomes you into the process without demanding perfection. And in the end, isn’t that what the best holiday traditions do—invite us to participate, create, and share without the pressure of getting everything exactly right?

For another easy no-bake candy to make as gifts this holiday season, try these Nutella Bonbons. Or make some pretty chocolate covered Oreos using a mold, or these peppermint dipped Oreos.
If you try this Rudolph Chocolate Covered Marshmallow Candy Recipe or any other recipe on my blog, please leave a 🌟 star rating and tell me how it went in the 📝 comments below. Thanks for visiting, and happy baking!

Chocolate Covered Marshmallow Rudolph Recipe
Equipment
- Piping Bags
- Microwave safe bowl
- Spoon
- Mini Spatula
- Egg Mold
Ingredients
- 12 Ounces Brown Melting Chocolate
- Marshmallow Fluff
- Pretzel Bows
- Red Candy Coated Chocolates
- Mini Candy Coated Chocolates
- Candy Eyes
Instructions
- Clean the mold and let it air dry.
- Using a microwave safe bowl, heat up the chocolate melts in the microwave in 30 second intervals until they are completely melted,
- Pour a small amount of chocolate, about 1/2 tablespoon into each slot of the egg mold. Use the back of a spoon or mini spatula to spread the chocolate around. Do this for each slot and then put the mold in the freezer for 8-10 minutes.
- One at a time, pour more chocolate into each slot, then spread the chocolate around again to create a second layer. This will help make the chocolate shell stronger. Place it back in the freezer for 3-5 minutes.
- Now put some of the mini candy coated chocolates into each chocolate shell. Next use a spoon to add the marshmallow fluff and put more mini candy coated chocolates on top of the fluff.
- Reheat the chocolate in the bowl for 30 seconds and use it to cover the candy and marshmallow fluff for each egg. Make sure it covers all of the openings so nothing leaks out. Place the mold in the freezer for 5-8 minutes.
- Put the remaining chocolate in a piping bag.
- Remove the mold to the freezer and place it on a flat surface. Slow and gently push the chocolate marshmallow eggs out of the mold.
- Break each pretzel bow in half. These will be the antlers.
- Cut a small hole at the tip of the piping bag and then pipe a small circle at the top of the wider end of the chocolate covered marshmallow. Place 1 half of the pretzel on the chocolate circle and hold it there until it sticks. Pipe more chocolate around the pretzel to make sure it stays in place. Do the same for the 2 second half of the pretzel bow. Then continue to put antlers on each chocolate Rudolph following the same steps.
- Pipe two small dots below the antlers and place a candy eye on each one. Let them sit fore 1 minute to dry.
- Pipe one more dot below the eyes and place the red candy coated chocolate on it, this will be Rudolph’s red nose.
Notes
- These Chocolate Covered Marshmallow Rudolphs are best eaten fresh but they can be stored in air tight container in a cool dry place for 2-3 days or in the fridge for 4-5 days.
- When applying the antlers, make sure the chocolate is warm and NOT hot. Hot chocolate can melt the shell, and it will take longer for the pretzel antlers to stick.
- To get the marshmallow fluff in the chocolate shells easier, put some butter on the spoon before scooping. The fluff will be less sticky and easier to manage.

Follow me on Pinterest for fun and easy cookie recipes for any occasion. If you try this recipe, please leave a comment and let me know how it went.

- Red Velvet Blossom Cookies Recipe: Festive and Easy to Make - February 18, 2026
- Baileys Irish Cream Cookie Recipe: Fun Leprechaun Hats - February 4, 2026
- Easy Flourless Chocolate Tart Recipe: A Gluten-Free Treat - January 29, 2026