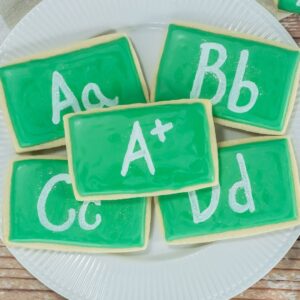
Chalkboard Cookies With Icing Recipe: Back to School Treat
These chalkboard cookies with icing are a fun treat to make to kick off the new school. A tasty sugar cookie topped with green icing to resemble a chalkboard. White chocolate chalk gives the cookies that classic dusty writing look. Write a personalized message to gift these cookies to someone special. Or, go with ABCs to stick with the school theme. This is a great treat for a school bake sale.
About Chalkboard Cookies With Icing
There are two parts to these chalkboard cookies with icing. First there’s the sugar cookie. A simple cut out cookie that’s topped with royal icing. I colored it green, but if you prefer a black chalkboard you could use black food coloring instead.
As with most sugar cookie recipes, there aren’t a lot of ingredients. So for me that means using a good quality butter and vanilla extract so that you get the absolute best flavor.
There are lots of ways to make icing for cookies, but the recipe I’ve used for these chalkboard sugar cookies uses meringue powder and corn syrup. Meringue powder is the key ingredient. It gives the icing stability and helps the icing harden so that you can write a message on it. The corn syrup helps add a little sheen to the icing, and it keeps the icing a little softer. It’s hard enough, but not too hard that it will crack.

Step by Step With Photos
These chalkboard cookies with icing are not difficult to make. However, they do take a bit of time because you need to let the icing harden overnight before writing a message on them. But the cookies themselves are a straight-forward, cut out cookie.
Start by lining two baking sheets with parchment paper and setting them aside. I prefer to bake one sheet of cookies at a time, but it’s helpful to have two available so that you can put another sheet in the oven to bake as you pull the first one from the oven. Preheat the oven to 350 degrees Fahrenheit.
Add 1 cup softened butter and 1 cup sugar to the bowl of a stand mixer. Mix until combined and then add 1 egg and 1 teaspoon vanilla. Again, mix until ingredients are fully incorporated.


Then gradually add 3 cups flour and mix until combined.


Pour the dough onto a lightly floured work surface and knead the dough to make sure that everything is mixed together. Don’t overwork the dough though.
Roll out the dough to about 5/8 thickness. Use a rectangle shaped cookie cutter to cut out the cookies. If you don’t have a rectangle, you can use a knife and straight edge (like a ruler) to cut out the shapes.


Bake the cookies for about 11-12 minutes. Be sure that you don’t overbake them. Pull them out of the oven just as the edges are starting to set, but the center is still soft.
Re-roll and cut the dough until it’s gone. Bake off the remaining cookies. Let them cool completely before decorating. If you’re preparing these chalkboard cookies with icing for a party, or bake sale, you can always prepare the cookies ahead of time and freeze them until you want to decorate.

When you’re ready to decorate the chalkboard cookies with icing, then it’s time to make the icing. Combine 2 cups powdered sugar, 1 teaspoon vanilla extract, and 2 tablespoons of meringue powder. Add 1/4 cup of water and use an electric mixer to mix for 2-3 minutes. Scrape down the sides of the bowl several times and continue mixing until thoroughly combined.
Now add the remaining 2 cups powdered sugar, 1 teaspoon vanilla, 2 tablespoons corn syrup and about 1/4 cup of water. Mix again until thoroughly combined. Finish mixing the icing by hand using a spatula. This lets you test the consistency of the icing. Remember this is an icing and not a frosting, so you don’t want it too thick. If it is too thick, add about 1 tablespoon of water at a time until it’s the consistency you want. If the icing is too thin and runny, then add powdered sugar 1 tablespoon at a time.
A test that you can do to see if you have the right consistency, is to stir the icing and watch the swirls that form on top. If they take about 15 seconds or so to disappear into the rest of the icing, then you know you’ve got it. This is just an estimate, so anywhere in the 15-20 second range works well.


Add the food coloring and mix until the icing is colored evenly. You can cover the bowl of icing with plastic wrap until you’re ready to decorate.
When you’re ready to decorate, pour the icing into a piping bag. Snip the end of the bag to make a small opening. Decorate the cookies by making an outline around the edge of the cookies and then fill it in with the icing. Use a toothpick to help spread the icing and to poke any bubbles that may form.


Leave the cookies out overnight so that the icing can harden. In the meantime, make the white chocolate chalk that is used to write the messages for these chalkboard cookies with icing.
Place 1/4 cup white chocolate in a microwave-safe bowl and microwave in 30 second intervals until the chocolate is smooth when stirred. Place the melted white chocolate in a piping bag and set aside to cool slightly.
Cut a few straws into 3 inch pieces. Use a rubber band to hold them all together, and place the straws upright in a bowl, or mug. Cut a hole in the tip of the piping bag and pipe the melted chocolate into the straws. Allow the chocolate to harden.

Once it has set, remove the straws. Use the chocolate chalk to gently write on the cookies. Don’t press too hard or the chocolate will break. It works best to do light strokes and to go over it a couple of times if needed.

The fun thing about chalkboard cookies with icing is that you can decorate them however you’d like. Green and black may be more traditional colors to use, but that doesn’t mean that you can’t get creative and use whatever colors you’d like. A hot pink icing with “Love” written on it would be a cute cookie to make for Valentine’s Day, or to give to someone special. These aren’t just good for back to school events. Make them year round and enjoy a cute and yummy treat.
If you need more back to school ideas, these Pencil Rice Krispie treats and Rice Krispie Rulers are fun no-bake treats. Another super treat are these Pencil Wafer Cookies.
If you try this Chalkboard Cookies With Icing recipe, or any other recipe on my blog, please leave a 🌟 star rating and tell me how it went in the 📝 comments below. Thanks for visiting and happy baking!
Chalkboard Cookies
Equipment
- Measuring Cups
- Measuring Spoons
- Parchment Paper
- Baking Sheet
- Electric mixer
- Rectangle cookie cutter
Ingredients
For the Cookies:
- 1 cup sugar
- 1 cup unsalted butter softened
- 1 egg
- 1 teaspoon vanilla
- 3 cup flour
For the Icing:
- 4 cup powdered sugar divided
- 2 Tablespoons meringue powder
- 2 teaspoons vanilla divided
- ½-¾ cup water divided
- 2 Tablespoons corn syrup
- Green food coloring
For Chalk:
- ¼ cup white chocolate
Instructions
- Preheat the oven to 350 degrees. Line a couple baking sheets with parchment and set aside.
- In the bowl of a stand mixer, combine the softened butter and sugar. Cream until smooth.
- Add in the egg and vanilla and mix to combine, scraping the sides and bottom often
- Add the flour and mix just until combined.
- Transfer the dough to your work surface and knead gently to make sure all ingredients are fully incorporated.
- Lightly flour the work surface and use a rolling pin to roll out the dough to about ⅝ of an inch thickness.
- Use a rectangular cookie cutter to cut out as many rectangles as you’re able. Save the dough and reroll as many times as possible.
- Carefully transfer the cut out cookies to the prepared baking sheets, leaving about ½-1 inch between each cookie. The cookies won't spread much.
- Bake in the preheated oven for 11-12 minutes, just until the edges are slightly browned and the center is set. Do not overbake. Allow to cool completely before decorating.
- For the icing, combine 2 cups of the powdered sugar, 1 teaspoon vanilla and 2 Tablespoons of meringue powder. Mix in about ¼ cup of water and use an electric mixer to mix well for about 2-3 minutes, or until thoroughly combined. Scrape down the sides of the bowl.
- Add the remaining 2 cups of powdered sugar, 1 teaspoon vanilla, 2 Tablespoons corn starch and about ¼ cup of water. Mix until thoroughly combined, scraping down the sides of the bowl as needed.
- Finish mixing the icing by hand. This lets you test the consistency. Add more water a tablespoon at a time to thin out the icing. Or, add more powdered sugar if it's too thin.
- Add the green food coloring and mix until thoroughly combined. If you aren't going to use the icing right away, place plastic wrap over the bowl.
- When ready to decorate, give the icing one final stir and then transfer the icing to a piping bag. Cut a small opening in the piping bag.
- Pipe around the outside edges and then fill in the center of each cookie. If needed, use a toothpick to help spread the icing and to pop any bubbles. Allow the decorated cookies to set for about 12-26 hours for the icing to harden before proceeding.
- For the white chocolate chalk, melt the white chocolate in a microwave safe bowl. Transfer to a piping bag and set aside to cool slightly.
- Cut a few straws into 3 inch size tubes. Place a rubber band around them to keep them tight and upright in a small bowl.
- Cut a small hole in the end of the piping bag and pipe the melted white chocolate into each straw. Allow to set completely.
- To remove the white chocolate from the straws, either unwrap carefully for paper straws, or cut open a plastic straw.
- Very carefully, write the desired message or decoration on the cookies. The white chocolate may crumble a bit but it adds to the theme with the chalk dust you’d see writing on an actual chalkboard. Do not press too hard in order to prevent the white chocolate chalk from breaking and from indenting the icing on the cookie. It's better to take several passes over the icing to darken the chalk.
Notes
Follow me on Pinterest for more fun and easy cookie recipes to make for any occasion. And if you try this recipe, be sure to leave a comment and let me know how it went.

- Red Velvet Blossom Cookies Recipe: Festive and Easy to Make - February 18, 2026
- Baileys Irish Cream Cookie Recipe: Fun Leprechaun Hats - February 4, 2026
- Easy Flourless Chocolate Tart Recipe: A Gluten-Free Treat - January 29, 2026